you are here: welcome  tell me about...   calibrating RIP settingsSkip site-wide navigation link group

external link to hewlett-packard home external link to hewlett-packard products and services external link to hewlett-packard support external link to hewlett-packard how to buy
spacerhp logo - inventspacer
hp designjet 815mfp
how do I...?
the problem is...
tell me about...
alphabetical index
hp designjet online
spacerfollow this link to top of page

End of site-wide navigation link group

tell me about calibrating RIP settings

Use this feature if you are using media that is not available in your profile list and you wish to fine tune the output results. The Calibrate RIP dialog (available from Setup > Printer > Add Media Profile) lets you adjust two parameters: Ink level and Gray balance.

calibrate raster image processing dialog

ink level

You can adjust the ink level if you are using a printer setup with the RIP CMYK, RIP CMY, RIP CMYKcm.

You evaluate the need for reducing the Ink Level from a sheet printed with your printer on the intended media. Your output Ink Level Sheet will be similar to the one shown below:

color sheet print

The sheet's color patches are different grades of complement colors to the printer's basic colors. Printing these colors will require more than one basic printer color, hereby firing a critical amount of ink onto the media. The ink level should only be reduced from 100% if any of these 3x3 patches bleed or the paper waffles too much. The 10th patch on the sheet is a straight black patch. If you lower the ink level, make sure that this black patch does not become lighter when you reprint the sheet. You can continue making adjustments and reprinting evaluation sheets until you are satisfied with the results.

gray balance

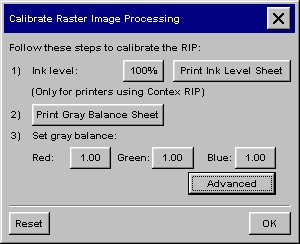
Gray Balance configuration offers the adjustment of gamma values for red, green and blue. The purpose is to ensure a 100% neutral appearance of printed gray. To assist you in setting the Gray Balance values for your printer, you can print out a set of gray scales with varying combinations of gamma by pressing the Print Gray Balance Sheet button. With the resulting printout you can visually determine the most neutral scale, read the gamma values off the printout and enter these values in the Gray Balance settings. The Gray Balance Sheet is shown below:

gray balance sheet

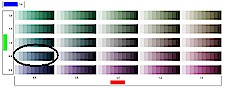
The Gray Balance Sheet displays a matrix with the red setting on the bottom axis and the green setting on the left. A single element in the matrix is a row of shades, as they look at the given gamma values. The blue value is fixed to 1.0.

You select the best row of shades in the matrix and use the gamma values to make your settings in the dialog. Start out in the middle of the sheet (1.0, 1.0, 1.0), and step up/down or left/right. If you believe the best values lie between two patches, you are free to enter mid values like 1.1 instead of 1.0 or 1.2. In the example above, if the row that shows the best balance is the one encircled then you would set Gray Balance to red = 0.6, green = 0.8 and blue = 1.0 in the dialog.

If no satisfactory standard Gray Balance can be found, Advanced Gray Balance calibration is necessary.

printing icon printing instructions printing instructions legal information legal information