 |
Using the Color
Print |
| |
|
Objective and Description
The objective of the Color Print is to determine whether the printer
hardware has any color reproduction problems. Before starting, load
a roll of HP High-Gloss Photo Paper or HP Heavyweight Coated Paper.
To start the Color Print, choose the printer icon on
the printer’s front panel, then Utilities > Test prints
> Color print. The printer will then print a page consisting
of three color scales as follows.
|
| |
 |
1. Yellow shading
into blue.
2. Magenta shading into green.
3. Cyan shading into red.
|
| |
Color lightness and density have
been tuned to maximize the effectiveness of the print.

|
| |
 |
 |
|
How to Evaluate the Print
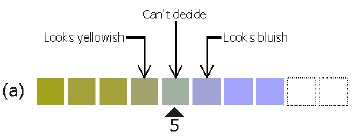
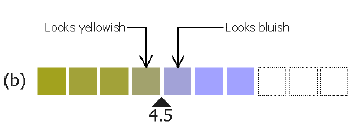
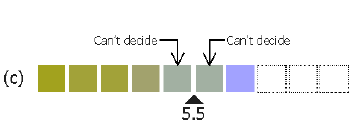
Place the print under a source of white light. For each of the
color scales in the print, select the square (or between two of
them if in any doubt) where the color transition happens. The three
following rules (a, b, c) show visually how to perform this evaluation.


Bear in mind that the transition could happen anywhere along the
line. Trust your perception!
How to Interpret the Result
If you get a number in the range 4.5 to 9.5, your printer is within
the
expected color reproduction accuracy.
If you get a number lower than 4.5 or higher than 9.5, try the
following:
1 Make sure that the Color Calibration is ON.
2 Perform Color Calibration on that paper.
3 Replace the lens on the Line Sensor and repeat the color calibration.
4 Replace the Line
Sensor. |
| |
 |
 |
|
How to Interpret the Result
If you get a number in the range 4.5 to 9.5, your printer is within
the expected color reproduction accuracy.
If you get a number lower than 4.5 or higher than 9.5, try the
following: |
| |
 |
1. Make sure that
the Color Calibration is ON.
2. Perform Color Calibration on that paper.
3. Replace the lens on the Line Sensor and repeat
the color calibration.
4. Replace the Line
Sensor. |
| |
