|
how do I use the previewing tools?
|
|
|
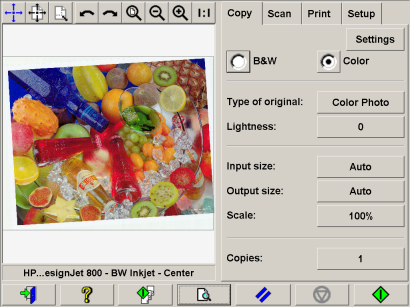
The Preview button  loads a fresh preview of the copy each time it is selected. loads a fresh preview of the copy each time it is selected.
The loaded image always uses the last settings made and the effects of the
settings will be visible in the new preview. This feature allows you to fine-tune your settings as
you watch them take effect before committing the copy to print.
You want...
...to display the whole
image...
...to zoom in on a specific
area...
...to zoom out from a selected
area...
...one-to-one pixel
viewing...
...to resize the paper
frame...
...to move the image...
...to position the paper
frame...
...to align the image...
|
|
|
|
|
to display the whole image... |
|
|
|
|
|

|
You can use the Zoom All tool to view large format originals in
the preview window. No matter what zooming level you start from, the Zoom All tool resizes
the image so that it exactly fits in the preview window.
|
|
|
|
|
|
to zoom in on a specific area... |
|
|
|
|

|
Use the Zoom In tool when you need to view details for making
enhancement settings and for aligning. Zooming takes place immediately with the zoom axis in
the center of the preview window. If you need to enlarge the image further, then continue to
press the Zoom In button until you get the required level of detail in the view.
|
|
|
|
|
|
to zoom out from a selected area... |
|
|
|
|

|
The Zoom Out tool decreases the image size in the preview window.
If you need to decrease the image further, then continue to press the Zoom Out button until
you get the required field of view.
|
|
|
|
|
|
one-to-one pixel viewing... |
|
|
|
|

|
Use the 1:1 tool to view the image with one scanned pixel shown
as one screen pixel.
|
|
|
|
|
|
to resize the paper frame... |
|
|
|
|

|
The resize paper frame tool lets you resize the paper frame
interactively in the preview window.
|
|

|
When activated, the Resize Paper Frame Tool partitions the areas
around the paper frame into sections. When a section is touched, the closest frame side or
corner is resized to the new position.
|

|
There are two ways to use the move image tool:
- Dragging: Dragging anywhere in the image window. Imagine you
are gripping hold of the image and dragging it around inside the window.
- Centering: Touch a point on the screen and that point will then
be centered in the preview window. The image shifts so that the point you selected becomes
repositioned in the center of the screen. This method is especially useful when zooming in
on image details. It lets you pick out important spots and center on them before zooming
in.
|
|
|
|
|
|
to position the paper frame... |
|
|
|
|

|
There are three ways to use the position paper frame tool:
- Dragging: Dragging anywhere on the screen. Imagine you are
gripping hold of the frame and dragging it around over the image.
- Centering: Touch a point on the screen and that point becomes
the new center for the paper frame. The frame shifts so that it positions itself with the
point you selected directly in its center. This method is especially useful when you are
making spot test strips for outputting on the printer. It lets you continuously and rapidly
reposition the frame on important areas that you want tested.
- Dragging the edges: This will resize the paper frame and is an
alternative to the Resize Paper Frame tool.
|
|
The original may have been inserted slightly off balance and
appears crooked in the preview window. Correcting this does not mean you have to reload the
original and start again.
Use the perfectly aligned sides of the paper frame as references when
realigning.
|
|


|
- Press the Align Left tool to tilt the image left.
- Press the Align Right tool to tilt the image right.
- Press the Copy button
 to output the image as you realigned it in the preview
window. to output the image as you realigned it in the preview
window.
|
|
 how do I...?