 |
Scan-Axis Calibration |
| |
|
PHONE
SUPPORT
The purpose of this Service Calibration is to calibrate the Printhead
in relation to the media and the Platen Assembly. This Calibration
also allows you to calibrate the Line Sensor and define the Line
Sensor ID.
The Scan-Axis Calibration performs the following:
|
| |
 |
-Line Sensor to calibrate the intensity
of the Line Sensor in the Carriage PCA.
-Printhead to Media Spacing.
|
| |
 |
| |
 |
Perform Scan-Axis Calibration whenever: |
| |
 |
-Carriage is disassembled or replaced.
-Encoder strip is disassembled or replaced.
-Center platen is disassembled or replaced. |
| |
 |
| |
| |
Perform the Scan-Axis Calibration
as follows: |
| |
|
 |
 |
1. In the Service
Calibrations submenu, scroll to "2.1 Scan axis" and press
Enter.

If the Media loaded is not the right size, the following message
is displayed. Press Enter to exit. Load the correct media and repeat
the procedure.
2. If the correct media is loaded, the following
message is displayed. Press Enter to confirm or Back to return to
the Service Calibrations menu.

3. When the following message is displayed, you
will need to enter the Line Sensor id.
|
| |
|
 |
|
 |
 |
To insert a number use the UP
and DOWN keys to scroll through a list of characters
in the following ranges: 1...9 and  (Backspace) to delete a character previously confirmed using the
Enter key. After selecting the first digit, press
Enter to insert the second digit. Press Enter
to continue when both digits have been entered.

If the Line Sensor ID is not indicated on the Line Sensor, use
the default value which is "0".
4. When you have inserted the Line Sensor Id.
the message below is displayed. Press Enter to confirm the number
and continue the calibration or Back to modify the number.

5. If you do not insert correct values the message
below is displayed. Press Enter to continue the calibration using
default values.
|
| |
|
 |
|
 |
 |

6. Once the media is detected, the Calibration
starts and the following message is displayed:

During this stage the Printer will print the following pattern.

7. The Printer then performs the Printhead to
media spacing calibration and displays the following message:

During this stage the Printer will print the following pattern.

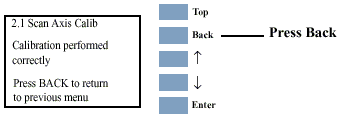
8. On successfully completing the Calibration,
the following message is displayed:

9. Press Back to return to the Service Calibrations
menu.
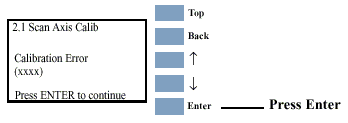
If the Calibration fails the following message is displayed. Press
Enter to continue.

|
| |
|
