|
|
|
||||||||||||||||||||||||||||||
|
1. Scan Axis Calibration
The purpose of this Service Calibration is to carry out a PWM check,
calibrate the intensity of the Line Sensor and calibrate the Line Sensor
position to the Black Printhead.
Perform the Scan Axis Calibration whenever:
Perform the Scan Axis Calibration as follows:
Make sure you load one of the following media into the
Printer before performing this calibration:
» HP Bond Paper.
» HP Glossy Media. » HP Coated Paper. » HP Productivity Photo Gloss. » HP Heavyweight Coated Paper. » HP Super Heavyweight Coated Paper. » HP Bright White Inkjet Paper.
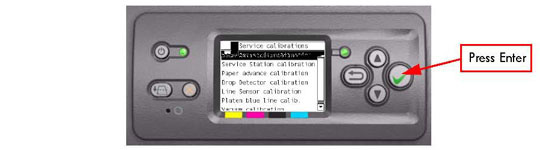
1. In the Service Calibrations submenu, scroll to "Scan Axis Calibration" and press Enter.
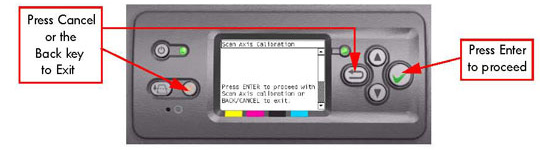
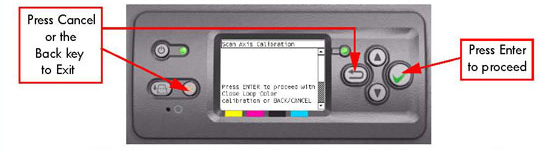
2. When the following message appears on the front panel, you must select whether you would like to continue with the calibration by pressing the Enter key. Press Back or Cancel to exit the calibration.
3. If media is not loaded, the following message appears on the front panel. Load media in to the Printer and start again from step 1.
 Before continuing, the Printer will check the following:
» The Media Lever is in the lowered position. » The correct paper type is loaded (check list on previous page). » The correct paper size (minimum paper size 24 inches). If these conditions are not met, a warning will be displayed on the Front
Panel and you will need to restart the Calibration from step 1.
Make sure you keep your hands away from the Print Platen
as the Carriage will be moving at high speed and you could
injure yourself or damage the Carriage Assembly.
4. The Printer will start to check the PWM. Once the PWM has been checked, the results will be displayed on the Front Panel. Press Enter to continue or press Back or Cancel to exit the calibration.

5. The Printer will start to calibrate the Line Sensor. Once the Line Sensor has
been calibrated, the results will be displayed on the Front Panel. Press Enter to
continue or press Back or Cancel to exit the calibration.
 If the values are not within the range specified, an error will appear on the
Front Panel. In this case, try the following:
» Try the Scan-Axis Calibration again.
» Replace the Line Sensor.
6. The Printer will start to calibrate the Line Sensor position to the Black
Printhead. It will print a line of black dots and then scan them:

7. Once the Line Sensor has been calibrated, the results will be displayed on the Front Panel. Press Enter to finish the calibration or press Back or Cancel to exit the calibration.

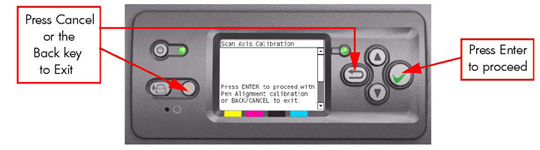
8. The Printer will now perform the Printhead Alignment. When the following message appears on the front panel, you must select whether you would like to continue with the calibration by pressing the Enter key. Press Back or Cancel to exit the calibration.
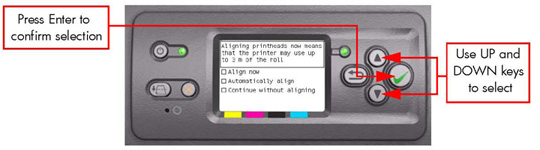
9. Before continuing with the Printhead Alignment, the following message will be displayed on the Front Panel. To continue with the Printhead Alignment, select "Align now" and press the Enter key.
10. Once the Printhead Alignment is completed, the following message will be displayed on the Front Panel. Press the Enter key to continue.
 If the Printhead Alignment fails for any reason, a warning message will
appear on the Front Panel. In this case, try the following:
» Enter the Front Panel menu and retry the Printhead Alignment. If the
Alignment completes successfully, then perform the Color Calibration.
» If the Alignment fails again, check the Alignment pattern to se if any of the Printheads are printing incorrectly. If necessary, perform a Printhead Recovery through the Front Panel and retry the Printhead Alignment.
11. The Printer will now perform the Color Calibration. When the following message appears on the front panel, you must select whether you would like to continue with the calibration by pressing the Enter key. Press Back or Cancel to exit the calibration.
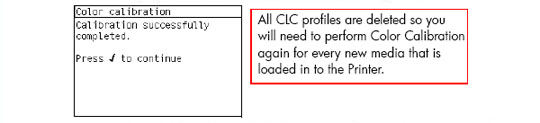
12. Once the Color Calibration is completed, the following message will be
displayed on the Front Panel. Press the Enter key to continue.
 If the Color Calibration fails for any reason, a warning message will appear
on the Front Panel. In this case, try the following:
» Enter the Front Panel menu and retry the Color calibration.
» If the Calibration fails again, check the Calibration pattern to see if any of the Printheads are printing incorrectly. If necessary, perform a Printhead Recovery through the Front Panel and retry the Calibration.
13. Once the complete Scan Axis calibration is completed successfully, OK will be displayed on the Front Panel.
 |
||||||||||||||||||||||||||||||
|
|||||||||||||||||||||||||||||||