|
|
|
||||||||||||||||||||||||||||||
|
3. Paper Advance Calibration
The purpose of this Service Calibration is to calibrate the nominal advance of the media. This calibration is necessary to control the exact movement of the media in order to avoid print quality problems like banding.
In order to perform this Calibration, you should order the Paper Advance Calibration Kit (Part Number Q1273-60125) which contains two sheets of HP Productivity Gloss Media.
Perform the Service Accuracy Calibration whenever:
The Paper Advance Calibration is split into three parts and should always be done in this order:
1. Print Calibration Pattern - The Printer first calibrates the Analog Encoder and then prints the Paper Advance Calibration pattern.
2. Scan Calibration Pattern - The Printer scans the Paper Advance Calibration pattern in order to calibrate the nominal advance of the media.
Only scan the Calibration Pattern in the Printer that was used to actually print it. Using the Calibration in a different Printer could cause it to experience media advance problems. After scanning the Calibration Pattern, it should be discarded.
3. Clean Drive Roller - After loading media that the customer will use, the Printer "prepares" the media path to prevent any future advance problems.
Perform the Paper Advance Calibration as follows:
Make sure that you unload media from the Printer before performing the Paper Advance Calibration.
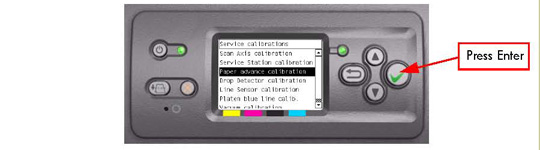
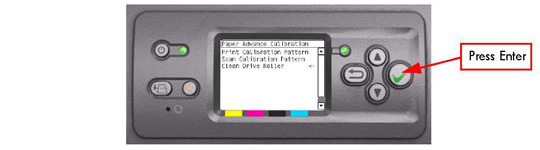
1. In the Service Calibrations submenu, scroll to "Paper Advance Calibration" and press Enter.
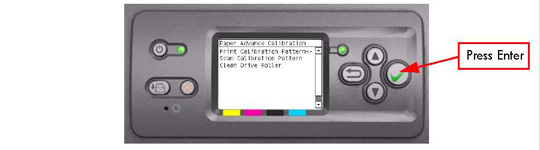
2. In the Paper Advance Calibration submenu, scroll to "Print Calibration Pattern" and press Enter.
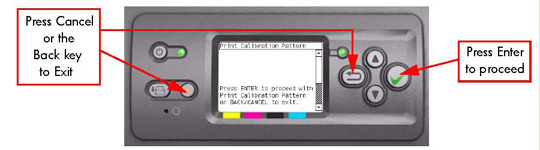
3. When the following message appears on the front panel, you must select whether you would like to continue with the calibration by pressing the Enter key. Press Back or Cancel to exit the calibration.
4. The Printer will start to calibrate the Analog Encoder and the following message will be displayed on the Front Panel.
 If the Calibration is not done or if the values are out of the limits, a warning
message will appear on the Front Panel. In this case, try the following:
» Check that the Printer has the latest Firmware version. If not, update the
Firmware to the latest version.
» Retry the Paper Advance Calibration. » If the problem continues, replace the Encoder Strip and Encoder Sensor.
5. Once the Analog Encoder has been calibrated correctly, the following message will appear on the Front Panel. Press the Enter key in order to start the media load process.

6. Load a sheet of HP Productivity Gloss Media that was included in the Paper Advance Calibration Kit (Part Number Q1273-60125) following the instructions on the Front Panel. If the kit is not available, then cut a piece of HP Productivity Gloss Media that is 36 inches wide and at least 45 inches long.
7. Once the media is loaded into the Printer, the following message will appear on the Front Panel. If roll media has been used instead of cut sheet media, then you will need to unroll a minimum of 1 meter of media in order to prevent any back tension which could cause any media advance problems. Press the Enter key to continue.

8. The Printer will start to print the Paper Advance Calibration Pattern. This could take several minutes during which the following message will be displayed on the Front Panel.

9. Once the Accuracy Calibration Pattern has been printed successfully, the following message will be displayed on the Front panel. Press the Enter key to continue.
 If the Paper Advance Calibration fails for any reason, a warning message
will appear on the Front Panel. In this case, try the following:
» Retry the Paper Advance Calibration.
» If necessary, perform a Printhead Recovery through the Front Panel and retry the Calibration.
Remove the pattern from the printer and leave it to dry for a
few minutes before continuing with the Calibration.
MAKE SURE NO MEDIA IS LOADED INTO THE PRINTER BEFORE
STARTING TO SCAN THE CALIBRATION PATTERN.
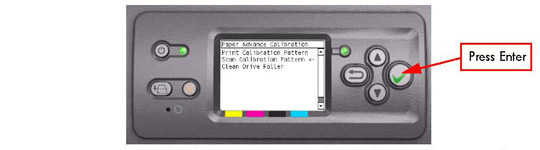
10. You will need to re-enter the Paper Advance Calibration submenu and scroll to "Scan Calibration Pattern" and press Enter.
11. When the following message appears on the front panel, you must select whether you would like to continue with the calibration by pressing the Enter key. Press Back or Cancel to exit the calibration.
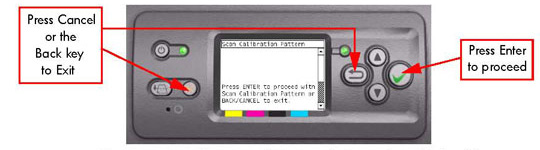
12. A message will appear advising you that you will need to load the Calibration Pattern in to the Printer. Make sure that you rotate the printed pattern 90° clockwise and reload it printed-side down, so that the black arrows go into the printer first. Press the Enter key to continue.

Take note that the Calibration Pattern will be loaded as a Roll
and NOT as a Sheet.
Only scan the Calibration Pattern in the Printer that was used to actually print it. Using the Calibration in a different Printer could cause it to experience media advance problems. After scanning the Calibration Pattern, it should be discarded.
When Loading the Calibration Pattern, use the Cutter blade on the Print Platen to align the edge of the sheet. If you follow this advise, you will prevent the cutter from cutting a section of the Calibration Pattern, which could cause the Calibration to fail.
13. Load the Calibration Pattern following the instructions on the Front Panel. Once the Calibration Pattern is loaded correctly, the following message will be displayed on the Front Panel. Press the Enter key to continue.

14. The Printer will scan the Calibration Pattern which could take several minutes. Once the calibration is completed successfully, the following message will be displayed on the Front Panel. Press the Enter key to continue.
 If the Paper Advance Calibration fails for any reason, a warning message
will appear on the Front Panel. In this case, try the following:
» Check that the Calibration Pattern was not incorrectly cut (trimming the
actual pattern) during the media load process. If this is the case, perform
the Paper Advance Calibration again from step 1.
» Perform a Line Sensor Calibration and then rescan the Calibration pattern. » Replace the Line Sensor. » If the problem continues, replace the Media-Axis Motor. After the Paper Advance Calibration has been performed
correctly, you MUST perform the Clean Drive Roller procedure.
If this is NOT done, the Printer will not perform correctly and
could cause Print Quality problems.
Before starting the Clean Drive Roller procedure, make sure you first load media into the Printer that the customer will normally use to print.
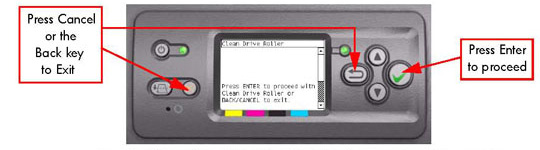
15. You will need to re-enter the Paper Advance Calibration submenu and scroll to "Clean Drive Roller" and press Enter.
16. When the following message appears on the front panel, you must select whether you would like to continue with the cleaning of the Drive Roller by pressing the Enter key. Press Back or Cancel to exit the calibration.
17. The Printer will begin the Drive Roller Cleaning procedure. This could take several minutes during which the following message will be displayed on the Front Panel.
 |
||||||||||||||||||||||||||||||
|
|||||||||||||||||||||||||||||||