| |
Status
Numbers |
Error Description |
Procedure |
| XX02 Reseat
XX06 Reseat
XX08 Reseat |
Continuity problem between the Printhead
and the Carriage Assembly. |
Try the following (verify if the message returns
to OK after each one).
1. Reseat the Printhead.
2. Remove the Printhead and clean the interconnect,
refer to Carriage Interconnect
Wiper.
3. Replace the failing Printhead.
4. Check the Carriage Tube Connector is correctly
connected to the Carriage.
5. Check Trailing Cable connections between the
Carriage Assembly and the Main PCA and replace the Trailing
Cable if damaged.
6. Replace the Carriage Assembly (See Carriage
Assembly and Belt).
|
| XX10 Reseat |
Electrical failure. |
| XX03 Replace |
Printhead smartchip failure. |
Replace Printheads. |
| XX04 Replace |
Setup Printhead installed. |
Install normal Printheads. |
| XX05 Replace |
Used setup Printheads installed. |
If priming Tubes install new Setup
Printheads otherwise install normal Printheads. |
| XX09 Replace |
Electrical failure. |
1. Replace the
Printhead(s).
2. Check Trailing Cable connections between the
Carriage Assembly and the Main PCA and replace the Trailing
Cable if damaged.
3. Replace the Carriage Assembly (See Carriage
Assembly and Belt).
4. Replace the Main
PCA. |
| XX11 Replace |
Incorrect type of Printhead
installed. |
If Tubes system is priming: install
Setup Printhead(s) |
| Ensure that you have HP No. 81 Printheads installed. |
| XX12 Replace |
Printhead does not match the rest
of the ink consumables. |
Ensure that all
the ink consumables are HP No. 81 |
| XX13 Replace |
Printhead smart chip failure. |
Replace the Printhead(s). |
XX14 Replace
XX15 Replace |
The Printhead has an internal electrical failure. |
1. Replace the Printhead(s).
2. Replace the Carriage Assembly (See Carriage
Assembly and Belt).
|
XX16 Replace
XX17 Replace |
The Printer was printing: Printhead short |
Select YES to replace Printheads or
NO to finish print job without the failed Printhead
(print quality is affected). You must replace the Printhead after
the print job. |
| XX18 Replace |
The Printhead smartchip detects an unapproved manufacturer. |
Install HP No. 81 Printheads. |
| XX20 Recover |
The Printhead has detected nozzle failure. |
1. You can continue using the Printhead
unless the (XX21)Replace message is displayed (the
affect on print quality depends on the print mode).
2. Perform the Recovery procedure (See How
to fix the Nozzle Defects). |
| XX21 Replace |
The Printhead has detected a significant number of
bad nozzles that affects print quality. |
Select YES to replace Printheads or
NO to finish the print job without the failed Printhead
(print quality may be affected).
The message will be displayed for every print job until you replace
the Printhead.
1. Attempt the Recovery procedure (See How
to fix the Nozzle Defects).
2. If the message persists replace the Printhead(s).
|
| |
Printhead Recovery Procedure |
| |
|
 |
The Printer regularly
performs a series of controls on the health of the Printheads and
when they start to degrade the Printer will prompt the user to recover
the Printhead [(XX20)Recover].
At this stage, the customer should obtain new Printheads. Depending
on the print mode being used (Max. Quality, Productivity or Max.
Speed) the Printer may still be able to print with an acceptable
print quality. Refer to How
to fix the Nozzle Defects for details on performing
Printhead recovery.
If the Printer is printing a job and the Printhead health degrades
to a significant degree [(XX16) and (XX17)Replace],
the front panel will display a warning.
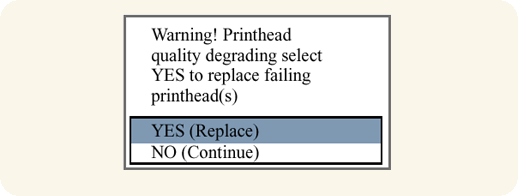
Press the  or
or  down
key to select YES or NO and press
the Enter key. If you select YES
the print job will be cancelled and Printhead replacement will be
started. If you select NO, the Printer will finish
the current print job. down
key to select YES or NO and press
the Enter key. If you select YES
the print job will be cancelled and Printhead replacement will be
started. If you select NO, the Printer will finish
the current print job. |
| |