| |
|
||||||||||||||||||||||||||||||||||||||||||||||||||||||||||
|
Using the Power Switch LEDs to Troubleshoot
In certain circumstances, the LEDs located on top of the power switch (located at the rear of the Printer) can help to troubleshoot the Printer. The LEDs can either be ON or Off and using different combinations can indicate different problems:
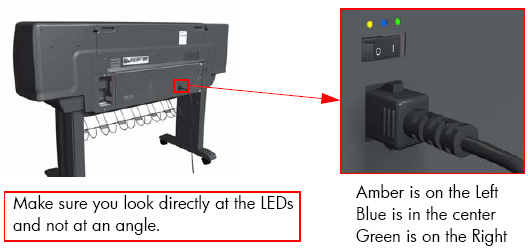
1. When only the Amber LED is On:
2. When the Blue LED is On: Deliver standard "ATX" power for the Electronics Module PCAs (+12V, +5V, -5V, -12V, etc...). All the functions of the Electronics Module are fully operational (EWS, etc...).
3. When the Green LED is On: Deliver "analog" 24V and 42V to enable printing.
The Printer monitors and reports different signals: PSU fan issues, 24V and 42V delivery failures (specific System Error reported pointing to PSU failure).
|
||||||||||||||||||||||||||||||||||||||||||||||||||||||||||
|
|||||||||||||||||||||||||||||||||||||||||||||||||||||||||||