| |
|
||||||||||||||||||||||||||||||
|
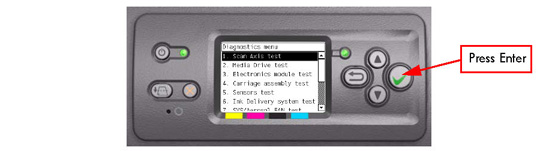
1. Scan Axis Test
The purpose of this test is to diagnose a failure in the operation of
components related to the Scan Axis.
You must perform the Scan-Axis Test after:
ALL THE COVER SENSORS ARE DISABLED WHEN IN THE SERVICE TESTS MENU. IF THE CARRIAGE IS MOVING IT WILL NOT STOP IF THE WINDOW IS OPENED, SO BE VERY CAREFUL NOT TO PUT YOUR HANDS INSIDE.
IF POSSIBLE ALWAYS PERFORM THIS TEST BEFORE REPLACING ANY COMPONENT OF THE SCAN-AXIS.
Perform the Scan Axis test as follows:
Perform this test with the Printheads and the Tubes System installed in order to get values that can be compared correctly.
1. In the Service Tests submenu, scroll to "1. Scan Axis test" and press Enter.
2. The Printer will start to initialize the Scan-Axis system and the Front Panel will display the following information:
If there is a failure at this point, the Front Panel will display System Error Code 01.0:10.
If there is a failure at this point, the Front Panel will display System Error Code 03:10. Check also System Error Code 01.0:10.
If there is a failure at this point, the Front Panel will display System Error Code 01.0:10.
If there is a failure at this point, the Front Panel will display System Error Code 03:10. Check also System Error Code 01.0:10.
If there is a failure at this point, the Front Panel will display System Error Code 01.0:10.
3. After initializing the Scan-Axis system, the following message will appear on the Front Panel.

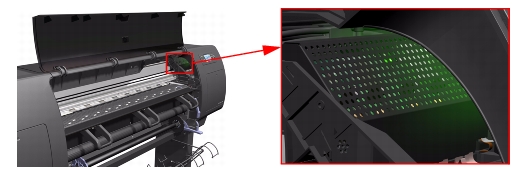
4. Open the Window and check that the Carriage power light is ON (a green light on the carriage PCA). Select Yes or No by using the Up and Down keys and press Enter to confirm your selection.
If you select No at this point, the Front Panel will display System Error Code 02.1:10. Check also System Error Code 11:10 or System Error Code 07:10.
If you select Yes, then the Front Panel will display:
If there is a failure at this point, the Front Panel will display System Error Code 02.1:10. Check also System Error Code 11:10 or System Error Code 01.1:10.
Unit Hangs Up - If no System error code is displayed on the Front Panel but the Printer hangs up and the last message on the Front Panel is "Booting up the Carriage" it means that the Carriage ASIC could not be detected. Troubleshoot this problem in the same way as if System Error Code 02.1:10 had appeared.
5. Once the Carriage is booted up, the Service Station will be prepared and moved to a safe position so that the Carriage can be moved. During this process, the following information will be displayed on the Front Panel:
If there is a failure at this point, the Front Panel will display System Error Code 21:12. Also, try to perform the Service Station Test.
Unit Hangs Up - If no System error code is displayed on the Front Panel but the Printer hangs up and the last message on the Front Panel is "Starting SVS Motor" it means that the SVS Motor could not be initialized. Troubleshoot this problem in the same way as if System Error Code 21:12 had appeared.
6. The Printer will program the duty cycle for the PWM test for the Scan-Axis Movement and leave it disabled and the following information will be displayed on the Front Panel:
If there is a failure at this point, the Front Panel will display System Error Code 01.0:10.
7. The Carriage will be moved to the middle of the Center Platen. If there is a failure in moving the Carriage, the Front Panel will display System Error Code 01.0:10.
8. The printer will now check that it can read the Encoder Strip. When the
following message appears on the Front Panel, open the Window and press
the Up key to move the Carriage to the left and the Down key to move the
Carriage to the right. Make sure that you move the Carriage in both directions
and check that the Carriage actually moves when a key is pressed.

If there is a failure at this point, the Front Panel will display System Error
Code 01.0:10. If the Carriage only moves in one direction, troubleshoot
the problem as System Error Code 01.0:10.
9. At the end of 10 Carriage movements, the Front Panel will display the maximum and minimum length (in encoder units) of the 10 movements and the overall average.

If Carriage movement has not been detected or if Carriage movement was very short, the Front Panel will ask you "Did the motor move?". If the answer is Yes (the Carriage had moved) press Enter. If the answer is No (the Carriage had not moved) press the Back key.
If you select No (the Carriage had not moved), the Front Panel will display System Error Code 42:10. Check also System Error Code 01.1:10 or System Error Code 01.0:10.
If you select Yes (the Carriage had moved), the Front Panel will display System Error Code 02:10. Check also System Error Code 11:10 or System Error Code 01.0:10.
If any max. or min. movement length is outside the + or - 20% average, then
this warning message will be displayed on the Front Panel "Some
movements out of avg +-20% range: Intermittent movements. PWM test
needed". This warning means that there is a mechanical problem in the
Printer (Encoder Strip, friction, Carriage Belt, Slider Rod, etc...). Press any
key to continue with the PWM test.
10. The Printer will now start to initialize the Scan-Axis servo and the Front Panel will display the following information:
If there is a failure at this point, the Front Panel will display System Error Code 86:10.
11. The Printer checks the complete length of the Scan-Axis and displays the result on the Front Panel. The length has to be between 1158629 and 1164616.

If it is shorter, it means that there is an obstacle blocking the Scan-Axis path and the Front Panel will display System Error Code 86:11.
If the length is longer, it means that the carriage has a datum broken or the
Carriage Stopper is not installed and the Front Panel will display System Error Code 02:10. Make sure you keep your hands away from the Print Platen
as the Carriage will be moving at high speed and you could injure yourself or damage the Carriage Assembly.
12. The Printer will now check the Scan-Axis PWM and the following information will be displayed on the Front Panel:
If there is a failure at this point, the Front Panel will display System Error Code 86:10.
13. The Printer will test the PWM at 61 ips and display the results on the Front Panel.

If some of the results are incorrect, the Front Panel will show "High Friction". Depending on the actual results received, the following should be done:
If there is a failure processing the PWM results, the Front Panel will display System Error Code 86:11. In this case try repeating the test again.
14. Once the test is completed, OK will be displayed on the Front Panel.
 |
||||||||||||||||||||||||||||||
|
|||||||||||||||||||||||||||||||