| |
|
||||||||||||||||||||||||||||||
|
2. Media Drive TestThe purpose of this test is to diagnose a failure in the operation of
components related to the Media Axis.
You must perform the Media Drive Test after:
IF POSSIBLE ALWAYS PERFORM THIS TEST BEFORE REPLACING ANY COMPONENT OF THE MEDIA-AXIS.
Perform the Paper Axis test as follows:
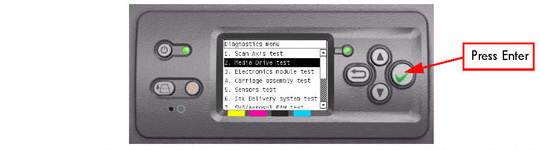
1. In the Service Tests submenu, scroll to "2. Media Drive test" and press Enter.
2. The Printer will start to initialize the Scan-Axis system and the Front Panel will display the following information:
If there is a failure at this point, the Front Panel will display System Error Code 01.0:10.
If there is a failure at this point, the Front Panel will display System Error Code 03:10. Check also System Error Code 01.0:10.
If there is a failure at this point, the Front Panel will display System Error Code 01.0:10.
If there is a failure at this point, the Front Panel will display System Error Code 03:10. Check also System Error Code 01.0:10.
If there is a failure at this point, the Front Panel will display System Error Code 01.0:10.
If there is a failure at this point, the Front Panel will display System Error Code 02.1:10. Check also System Error Code 11:10 or System Error Code 01.1:10.
Unit Hangs Up - If no System error code is displayed on the Front Panel but the Printer hangs up and the last message on the Front Panel is "Booting up the Carriage" it means that the Carriage ASIC could not be detected. Troubleshoot this problem in the same way as if System Error Code 02.1:10 had appeared.
3. The Printer will now check the revision of the PCA and the following message will be displayed on the Front Panel:
The value for the PCA revision must be more than 0.625V, if not the Front Panel will display System Error Code 01.1:10.
4. The Printer will program the duty cycle for the PWM test for the Media Drive Movement and leave it disabled and the following message will be displayed on the Front Panel:
If there is a failure at this point, the Front Panel will display System Error Code 01.0:10.
5. Before continuing, the following message will appear on the Front Panel. Remove the media if it is still loaded and make sure you stay out of the Print Platen area if the Window is open.

6. The Printer will now test the Media Drive moving in an open loop in one direction and the following message will be displayed on the Front Panel. Press any key to continue the test:
 Check that the movement done is more than 100 encoder units (in absolute
value). If the movement done is less than 100 encoder units then open the
Window and check for any visible obstacles restricting the movement of the
Drive Roller or the Overdrive Assembly. In this case, press any key to finish
the test.
7. The Printer will now test the Media Drive moving in an open loop in the opposite direction and the following message will be displayed on the Front Panel. Press any key to continue the test:
 Check that the movement done is more than 100 encoder units (in absolute
value). If the movement done is less than 100 encoder units then open the
Window and check for any visible obstacles restricting the movement of the
Drive Roller or the Overdrive Assembly.
If the Encoder Units is less than 100, the Printer will request you to follow these instructions:
8. The Printer will now check the Media Drive servo system and the following messages will be displayed on the Front Panel:
If there is a failure at this point, the Front Panel will display System Error Code 81:10.
If there is a failure at this point, the Front Panel will display System Error Code 56:03.
Once the Analog Encoder calibration is completed, the Front Panel will display the results:
 Acceptable values are:
If the results are acceptable, press Enter. If the results are unacceptable, then press the Back/Cancel key and the Front Panel will display System Error Code 56:10.
If there is a failure at this point, the Front Panel will display System Error Code 81:10.
If there is a failure at this point, the Front Panel will display System Error Code 56:10.
9. The Printer will now check the Media Drive PWM. You must load media in to the Printer and press any key to continue the test.

10. When the PWM check is being performed, the following message will be displayed on the Front Panel:
11. Once the PWM check is done, the results will be displayed on the Front Panel. Press any key to finish the test:

If there is a failure at this point, the Front Panel will display:

12. Once the test is completed, OK will be displayed on the Front Panel.
 |
||||||||||||||||||||||||||||||
|
|||||||||||||||||||||||||||||||