select printer | 500/800 series | disassembly | disassembly instructions
hp designjet 500/800 series printers
» disassembly
  » disassembly instructions
» screw types
» Left Hand Cover
» Right Hand Cover
» Front Panel
» Window and Top Cover
» Media Deflectors
» Left End Roll-Feed
» Right End Roll-Feed
» Back Platen
» Media Sensor
» Formatter
» LAN Card
» Spittoon
» Electronics Module
» Power Supply
» Scan-Axis Motor
» Cutter Assembly
» Left Encoder Holder
» Cutter Bushing
» Cutter Guide Bracket
» Drive Roller Encoder Sensor
» Trailing Cable
» Ink Supply Station
» Interconnect PCA
» Service Station and Aerosol Fan
» Cutter Guide
» Print Platen
» Service Station Holder
» Interconnect Cable
» Ink Supply Tubes
» Vacuum Fan
» Pinch-Arm
» Pinch-Arm Mechanism
» Pinch-Arm Lever
» Pinch-Arm Sensor
» Fork Idler, Tensioner and Idler Pulley
» Encoder Strip
» Carriage Assembly
» Paper-Axis Motor
» Drive Roller
» Gear Assemblies
  » disassembly videos
» send feedback or
comments
 
» Scan-Axis Motor Assembly

WARNING: Switch off the printer and remove the power cable.

NOTE: Refer to the table on » Screw Types for information on screw types.


1. Remove the Left Hand Cover » Left Hand Cover.

2. Remove the Right Hand Cover » Right Hand Cover.

3. Remove the Power Supply» Power Supply.

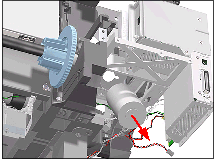
4. Disconnect the Scan-Axis Motor Cable from the Electronics Module.


5. Release the tension from the right hand side of the Belt by pulling the Tensioner down and pushing it towards you to lock it into position.

6. Remove the left hand side of the Belt from the Scan-Axis Motor.

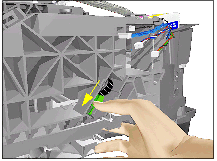
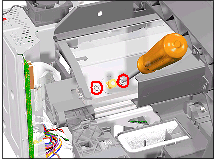
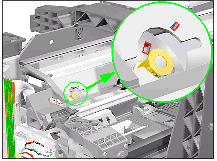
7. Remove 2 T-20 screws (Type C) from the Scan-Axis Motor.

NOTE: Make sure that you keep hold of the Scan-Axis Motor when removing the screws, otherwise the Motor could fall and be damaged.

8. Remove the Scan-Axis Motor.

Installing the Scan-Axis Motor

NOTE: When installing the Scan-Axis Motor, make sure that you insert the notch in the Printer into the slot in the Scan-Axis Motor.

© 1994-2006 Hewlett-Packard Company