select printer
|
500/800 series
|
disassembly
|
disassembly instructions
hp designjet 500/800 series printers
select printer
1000/1000 plus series
500/800 series
5000/5500 series
multi-roll feeder
10ps/20ps/30/30n/50ps
scanner series
70/100/100plus/110plus
90/120/130 series
4000 series printers
4500 series printers
9000s series printers
10000s series printers
Z2100/Z3100 series
8000s series printers
»
disassembly
»
disassembly instructions
»
screw types
»
Left Hand Cover
»
Right Hand Cover
»
Front Panel
»
Window and Top Cover
»
Media Deflectors
»
Left End Roll-Feed
»
Right End Roll-Feed
»
Back Platen
»
Media Sensor
»
Formatter
»
LAN Card
»
Spittoon
»
Electronics Module
»
Power Supply
»
Scan-Axis Motor
»
Cutter Assembly
»
Left Encoder Holder
»
Cutter Bushing
»
Cutter Guide Bracket
»
Drive Roller Encoder Sensor
»
Trailing Cable
»
Ink Supply Station
»
Interconnect PCA
»
Service Station and Aerosol Fan
»
Cutter Guide
»
Print Platen
»
Service Station Holder
»
Interconnect Cable
»
Ink Supply Tubes
»
Vacuum Fan
»
Pinch-Arm
»
Pinch-Arm Mechanism
»
Pinch-Arm Lever
»
Pinch-Arm Sensor
»
Fork Idler, Tensioner and Idler Pulley
»
Encoder Strip
»
Carriage Assembly
»
Paper-Axis Motor
»
Drive Roller
»
Gear Assemblies
»
disassembly videos
»
send feedback or
comments
»
Ink Supply Tubes
1.
Perform the Service Utility "Change Ink Tubes"
»
Change Ink Tubes
.
2.
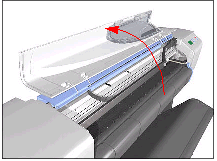
Open the Window and locate the Carriage Assembly.
3.
Release the latch and lift up the Carriage Cover.
4.
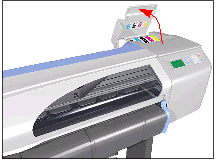
Remove all the Printheads.
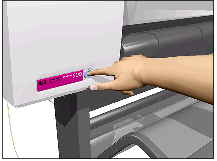
5.
Open the Ink Cartridge Access Cover.
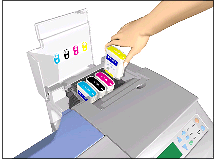
6.
Remove all the Ink Cartridges.
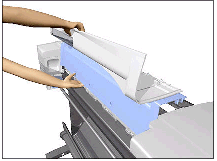
7.
Remove the Top Cover and Window
»
Window and Top Cover
.
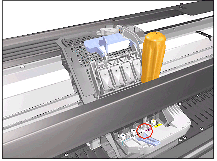
9.
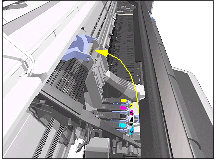
Loosen 1 T-8 screw that secures the Tubes to the Carriage.
10.
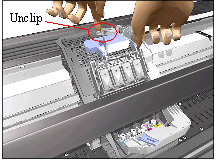
Unclip the Tubes from the Carriage and lift up.
11.
Unclip the tubes from the Tubes Guide.
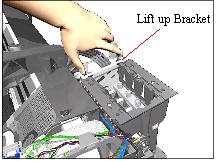
12.
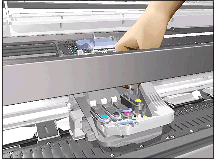
Release the Tubes Bracket from the Ink Supply Station by pushing the clips inwards and lifting up the Bracket.
13.
Remove the complete Ink Supply Tubes Assembly from the Printer.
privacy statement
using this site means you accept its terms
© 1994-2006 Hewlett-Packard Company