select printer | 500/800 series | disassembly | disassembly instructions
hp designjet 500/800 series printers
» disassembly
  » disassembly instructions
» screw types
» Left Hand Cover
» Right Hand Cover
» Front Panel
» Window and Top Cover
» Media Deflectors
» Left End Roll-Feed
» Right End Roll-Feed
» Back Platen
» Media Sensor
» Formatter
» LAN Card
» Spittoon
» Electronics Module
» Power Supply
» Scan-Axis Motor
» Cutter Assembly
» Left Encoder Holder
» Cutter Bushing
» Cutter Guide Bracket
» Drive Roller Encoder Sensor
» Trailing Cable
» Ink Supply Station
» Interconnect PCA
» Service Station and Aerosol Fan
» Cutter Guide
» Print Platen
» Service Station Holder
» Interconnect Cable
» Ink Supply Tubes
» Vacuum Fan
» Pinch-Arm
» Pinch-Arm Mechanism
» Pinch-Arm Lever
» Pinch-Arm Sensor
» Fork Idler, Tensioner and Idler Pulley
» Encoder Strip
» Carriage Assembly
» Paper-Axis Motor
» Drive Roller
» Gear Assemblies
  » disassembly videos
» send feedback or
comments
 
» Service Station Holder

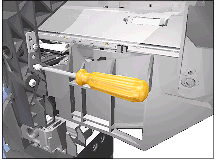
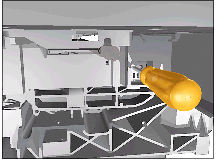
WARNING: Switch off the printer and remove the power cable.

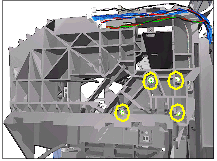
NOTE: Refer to the table on » Screw Types for information on screw types.


1. Remove the Left Hand Cover » Left Hand Cover.
  2. Remove the Right Hand Cover » Right Hand Cover.

3. Remove the Right Hand Trim.
4. Remove the Front Panel Assembly » Front Panel.

5. Remove the Interconnect PCA » Interconnect PCA.

6. Remove the Service Station » Service Station and Aerosol Fan.

7. Remove the Fork Idler, Tensioner and Idler Pulley » Fork Idler, Tensioner and Idler Pulley .

8. Remove the Encoder Strip » Encoder Strip .

9. Remove 1 T-15 screw (Type E) that secures the Service Station Holder to the sideplate.

10. Remove 1 T-15 screw (Type E) that secures the Service Station Holder to the sideplate (located underneath the Service Station Holder).

11. Remove 4 T-20 screws (Type C) that secure the Service Station Holder to the Printer Chassis.
12. Remove the Service Station Holder.
© 1994-2006 Hewlett-Packard Company