select printer | 500/800 series | disassembly | disassembly instructions
hp designjet 500/800 series printers
» disassembly
  » disassembly instructions
» screw types
» Left Hand Cover
» Right Hand Cover
» Front Panel
» Window and Top Cover
» Media Deflectors
» Left End Roll-Feed
» Right End Roll-Feed
» Back Platen
» Media Sensor
» Formatter
» LAN Card
» Spittoon
» Electronics Module
» Power Supply
» Scan-Axis Motor
» Cutter Assembly
» Left Encoder Holder
» Cutter Bushing
» Cutter Guide Bracket
» Drive Roller Encoder Sensor
» Trailing Cable
» Ink Supply Station
» Interconnect PCA
» Service Station and Aerosol Fan
» Cutter Guide
» Print Platen
» Service Station Holder
» Interconnect Cable
» Ink Supply Tubes
» Vacuum Fan
» Pinch-Arm
» Pinch-Arm Mechanism
» Pinch-Arm Lever
» Pinch-Arm Sensor
» Fork Idler, Tensioner and Idler Pulley
» Encoder Strip
» Carriage Assembly
» Paper-Axis Motor
» Drive Roller
» Gear Assemblies
  » disassembly videos
» send feedback or
comments
 
» Paper-Axis Motor

WARNING: Switch off the printer and remove the power cable.


1. Remove the Spindle.
  2. Remove the Left Hand Cover » Left Hand Cover.
  3. Remove the Back Platen (make sure the Lever is in the UP position) » Back Platen .

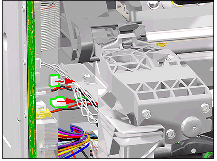
4. Disconnect the Paper-Axis Motor Cables from the Electronics Module.


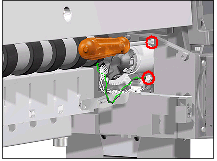
5. Remove 2 T-15 screws (Type J) from the Paper-Axis Motor.

NOTE: Make sure that you keep hold of the Paper-Axis Motor when removing the screws, otherwise the Motor could fall and be damaged.


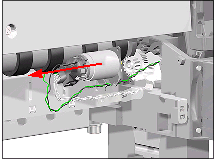
6. Remove the Paper-Axis Motor (including the cables).


© 1994-2006 Hewlett-Packard Company